Pease Read – IT WILL MAKE YOUR LIFE EASIER
First of all
- Don’t delete this “README” page. It is hidden from the navigation and not visible outside. Feel free to update it!
- Also don’t delete the “TestPage”, it is not visible either.
The WYSIWYG editor
Jahia’s buit-in editor is very restricted (does not allow headings, chosing fonts, indenting, etc). They also use an outdated version.
To obtain a more powerful editor, follow these steps:
- Google Chrome
- Download the “Jahia Editor Enhancer” extension by clicking this link: http://jahia-prod.epfl.ch/files/content/sites/lamp/files/readme-page/jahia-editor.crx. Then go to Tools -> Extensions and drag (yes, drag it) the .crx file to the page.
- Firefox
- Use (latest) Firefox
- Install Greasemonkey: https://addons.mozilla.org/en-US/firefox/addon/greasemonkey
- Re-start Firefox
- Install the following user script (just click the link): http://jahia-prod.epfl.ch/files/content/sites/lamp/files/readme-page/jahia-editor.user.js
Now two things will happen:
- When you open the editor for a page, after 2 seconds, additional functionalities in the (old, outdated) editor get enabled.
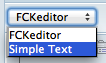
- If you switch to the “Simple Text” editor [*], after 2 seconds you will get the latest version of CKEditor, with all functionalities.
- Drawback of the new version: it’s not integrated with the CMS, so there’s no GUI for searching files (images, downloads..) on the server.
[*] Editor selection:
(In the Firefox version, there seem to be some memory leaks. Feel free to track them down 🙂 Until then, re-start Firefox from time to time…)
Code blocks and syntax highlighting
There are two options for integrating source code snippets into a site:
- With the enhanced editor, just use the monospace font (Courier New). There’s no syntax highlighting.
- For larger code blocks, create a new Jahia box (“Add a new box in the column”), and select as Type “Formatted Code”. Then you can add source code in the box and chose a language for syntax highlighting.
Tables
- To format tables, there are two pre-defined CSS classes: “table” and “table2”. See http://jahia.epfl.ch/page-41680-en.html.
- By default, tables span 100% of the page width. You can override this in the following way:
<table class=”table2″ style=”width:300px;”> - When merging cells, vertical alignment cannot be specified, there’s some bug. Jahia people are looking at it.
Hiding Content
In some cases, you will like to temporarily hide content from a page. For instance, after copying a course website to the archive, you might want to hide some of the content on the new site, and only re-enable it later in the year.
Unfortunately, there’s no easy way to do that.
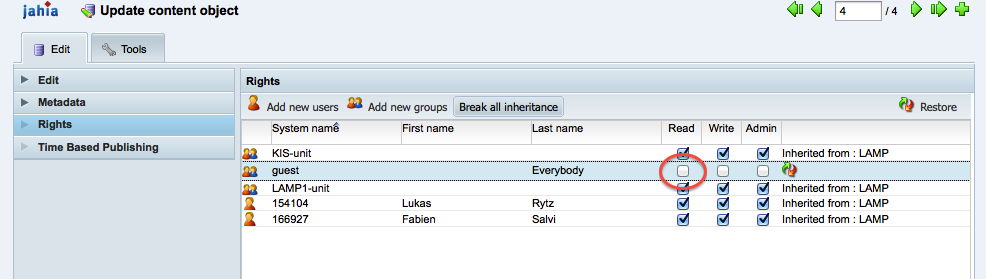
The only solution consists in having a Jahia box at the end of the page which is invisible to visitors. This can be achieved by removing the “Read” permission for the group “guests”. Look at the example at the bottom of this page for more details.
To temporarily hide content, you can copy-paste it to the hidden box: open the editor, copy (cut) the content, open the editor of the hidden box, paste the content.
Hosting of files
For adding downloadable files to a page, you have two options:
- Use the directory “/home/wwwlamp/htdocs/files/”, accessible via chara.
- Use this for files that belong to a course: slides, exercises, exams, etc…
- Please use / create sub-folders.
- The files are accessible at the base URL http://lampwww.epfl.ch/files/
- When you place a file in the named folder, it is NOT immediately available in the web-server / under the URL. The web-server synchronizes regularly from the folder into its local cache.
- In order to force a synchronization, open the page https://mywww.epfl.ch/labs/lamp/websites/update-lamp-website.php
- Use the included “File manager” (there’s a button in the blue bar with editor’s tools above the site).
- Use this for for files that belong to the website: images, general documents etc…
- Put the files into the “lamp” folder in the “Current Site Repository”.
- Feel free to create sub-folders.
Staff Page: Photos
To display your photo on the Staff page, follow these steps:
- Go to your profile page: https://people.epfl.ch/first.last
- Click “login” on the top right
- Click “edit” for “profile in english”
- Above your photo, there’s an icon to hide (
 ) or show (
 ) your photo. Make sure it is enabled, i.e.
You can also change your profile picture there.
Archiving a course website
In order to copy a course website into the archive, you have to execute carefully & exactly the following steps.
- Go to the “Teaching” page.
- In the righthand-side navigation, find the course you want to archive.
- Click the
 button of the course and select “Copy the page and sub-pages”.
 - Wait for the task to finish.
- Open the “Course Archive” page.
- Click the
 button of the course you are archiving, and select “Paste the pages”.
 - Wait for the task to finish.
- Click the button of the newly created page in the archive, and select “Update a page”.
- Rename the page to the year.
Now you can go ahead can clean out the original pages (the ones not in the archive) to start a new course.
IMPORTANT: Every course needs to have its own folder for hosted files. For instance, in Advanced Programming, the course files are stored in “/home/wwwlamp/htdocs/files/courses/proga/2011/…”. For every new year, a new directory is created.
Google Analytics
Traffic on this site is monitored using Google Analytics. Log in to http://www.google.com/analytics/ with the account “[email protected]”. The password is available on https://mywww.epfl.ch/labs/lamp/wiki/.
Hidden Box
This is an example for a box that is hidden from visitors.
If you edit the box (not this content), and go to the “Rights” page, you see the following: